
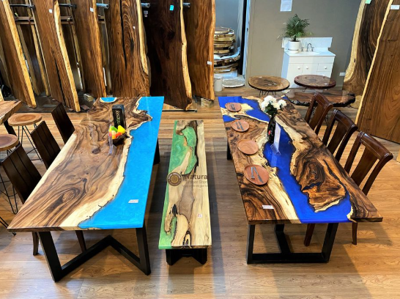

Epoxy resin furniture looks almost magical when it’s finished—wood grain framed by a glass-like river of color or crystal-clear shine. It’s easy to admire, harder to imagine how it’s made. Behind every glossy table or bench is a workshop full of tools, clamps, sanding dust, and quite a bit of patience.
If you scroll through collections such as thunderwood.studio/collections/all, you’ll notice no two pieces look alike. That’s not by accident. Each one is the result of a process that respects the raw material but isn’t afraid to push it in new directions. Let’s walk through how a slab of wood becomes the kind of furniture that stops people in their tracks.
Step 1: Picking the Wood
Everything starts with the slab. Makers often look for boards that would be cast aside in traditional carpentry: cracked walnut, spalted maple with wild patterns, oak with holes or voids. What some see as flaws, resin artists see as character waiting to be highlighted.
Moisture content matters. Wood fresh from a sawmill holds too much water, so it usually gets kiln-dried until stable. If this step is skipped, resin can bubble or peel away later.
Step 2: Cleaning and Shaping
Once chosen, the slab is stripped of bark and leveled. A planer or sander smooths the top, while weak spots may be filled or reinforced. This is also when decisions are made: keep the natural live edge or square it off? Split the board into two halves for a “river” design, or leave it whole with resin only in cracks?
What happens here determines whether the final piece looks rustic, sleek, or somewhere in between.
Step 3: Building the Mold
Resin doesn’t stay put on its own—it needs a container. Makers build a mold, usually from melamine boards coated so resin won’t stick. Seams get sealed with silicone, because even a hairline gap can turn into a sticky leak. The slab is clamped into place inside this form, ready for the pour.
It’s a little like setting the stage before the performance. Once the resin is mixed, there’s no time to rebuild anything.
Step 4: Mixing the Resin
Epoxy resin comes in two bottles: resin and hardener. Combine them in the right ratio and you get a liquid that slowly hardens into something clear and solid. Stir too fast and bubbles form. Wait too long and the mixture thickens before you’ve poured a drop.
At this stage, pigments or powders can be added—deep blues for a river look, metallic swirls for drama, or nothing at all if the goal is crystal clarity.
Step 5: The Pour
This is the part most people picture: resin flowing into gaps around the wood. Depending on the thickness of the piece, makers may pour in layers. A torch or heat gun often passes over the surface to pop bubbles as they rise.
Watching the liquid settle around the grain is oddly hypnotic. The design isn’t fully visible yet, but you can sense what it’s becoming.
Step 6: Waiting Game
Once poured, the piece needs to cure. That means sitting quietly for a day or two, sometimes longer for thicker sections. During this time, dust is the enemy. A stray hair landing in the resin can ruin hours of work. Most makers keep the project covered until it hardens enough to resist debris.
When the mold finally comes off, the furniture looks rough around the edges. Literally—the resin forms sharp borders that need trimming.
Step 7: Sanding—Lots of It
Sanding is where patience is truly tested. The piece starts with coarse grit, slowly moving finer and finer. It’s not unusual to go through a dozen different grits, ending with ultra-fine pads that leave the surface silky.
Every scratch must be removed before moving to the next stage. Skip one, and it will show forever under the polished finish.
Step 8: Polishing and Finishing
After endless sanding, polish brings the “glass” effect. Buffing compounds are applied, sometimes followed by a protective coat or oil on the wood portion. Suddenly, the colors pop. The resin shines like water, and the grain glows as if lit from within.
Legs or a base are added now, whether sleek metal, rustic wood, or something custom. This is the point where it finally looks like furniture instead of a workshop experiment.
Step 9: The Reveal
What started as a flawed slab and a couple of bottles of resin is now something entirely new. Every table is unique because no two slabs or pours behave the same way. That unpredictability is part of the charm—nature provides the outline, and the maker adds the brushstrokes.
Why It’s More Than Just Furniture
Knowing the steps makes it clear why epoxy resin furniture feels different from factory-made pieces. There’s no conveyor belt, no exact duplication. Each stage requires choices, skill, and plenty of time. From the selection of wood with its imperfections to the moment the last polish reveals depth you didn’t expect, the process itself becomes part of the story.
For the owner, that means the table in your dining room isn’t just a surface. It’s a collaboration between tree, resin, and human hands.
Resin furniture is as much about the journey as the result. From the first cut of wood to the final buff, each step layers craft onto creativity. Next time you see a shimmering river table or a bench with resin veins running through it, you’ll know the quiet hours and careful work that shaped it.
For those curious about how makers bring these pieces to life, ThunderWood Studio offers a glimpse into just how wood and resin can be combined to tell a new story in furniture design.
(0) comments
We welcome your comments
Log In
Post a comment as Guest
Keep it Clean. Please avoid obscene, vulgar, lewd, racist or sexually-oriented language.
PLEASE TURN OFF YOUR CAPS LOCK.
Don't Threaten. Threats of harming another person will not be tolerated.
Be Truthful. Don't knowingly lie about anyone or anything.
Be Nice. No racism, sexism or any sort of -ism that is degrading to another person.
Be Proactive. Use the 'Report' link on each comment to let us know of abusive posts.
Share with Us. We'd love to hear eyewitness accounts, the history behind an article.