

Building a house can feel overwhelming. The average build needs 22 subcontractors to work on your home. The process breaks down into standard milestones that make the whole experience more manageable.
Your house construction takes about 12 to 24 months from foundation to completion. Each step in the building process helps you stay connected with your project. The construction stages break down into smaller, easier parts. This makes everything clearer for first-time builders. You'll need to get finance approval, secure building licenses, and settle the land purchase before construction starts.
Brisbane home builders, OJ Pippin Homes, explore what you need to know as a first-time home builder.
Planning and Pre-Construction
Your dream home experience starts well before the first shovel hits the ground. The original steps that come before construction will build the foundation for a successful project. While understanding the construction stages is essential, it’s equally important to recognize the value of working with a design-build firm that manages both the architectural planning and the building process under one roof. Companies like HouseIdea in Sacramento streamline this journey by providing in-house design services, permit handling, and complete construction management. This integrated approach helps first-time builders avoid miscommunication between architects and contractors, ensures that budgets are maintained, and keeps projects on schedule, making the complex process of building a home far more manageable.
1. Finding and buying the right land
The right plot becomes your first big decision. Your location should be the main priority — how close you are to schools, work, and amenities will shape your daily life and property value. The land's zoning laws will dictate how you can use the property and might limit building types and heights. A title search before buying will confirm that no disputes or claims could restrict your building plans. Your plot's shape and size will affect your home's design options by a lot. Rectangular blocks give you more flexibility than irregular shapes.
2. Choosing the type of house: custom, spec, or tract
You'll need to pick from three main housing types. Custom homes let you control every design detail but custom home builders charge more and need 12-24 months to build. Spec homes are what developers build without specific buyers in mind. These homes strike a balance between personal touches and convenience. Tract homes pop up in large subdivisions with fewer floor plans to choose from. They cost less per square foot and finish faster. Your budget, timeline, and wish for customization should guide your choice.
3. Hiring your builder and design team
The right professionals will make or break your project. Look into your builder's history, past projects, and dedication to sustainable practices. Ask to see their work and talk to their previous clients. Design-build construction companies can handle both design and building under one roof. This setup can cut weeks or months from your timeline. Such a comprehensive approach promotes accountability and keeps your vision intact from start to finish.
4. Getting permits and approvals
You can't skip the approval process. Most projects need a building permit — written approval from a registered building surveyor that confirms your plans follow regulations. Local councils must issue planning permits before you can get building permits. You'll need detailed plans, specs, and supporting documents for your application. Take your time here — rushing permits often leads to costly delays or legal problems that stop construction.
5. Preparing your finances and construction loan
Construction loans work differently than regular mortgages. They release money in stages as building moves forward. You'll need to save at least 10% of your property's value for a deposit. These loans usually start with interest-only payments during construction. Your builder gets "progress payments" at key building milestones. Most lenders want you to start using the loan within 6 months and finish building within 24 months. Your loan application needs a fixed-price building contract, council-approved plans, and builder's insurance details.
Structural Build and Exterior Work
Your plot's physical transformation begins after plan approval and financial arrangements. The structural build and exterior work will make your home rise from the ground up.
1. Clearing and levelling the site
An excavation company removes rocks, vegetation and underground obstructions from your plot. The cut-and-fill technique moves soil from high points to low areas and creates a flat foundation. The ground needs compaction to prevent soil movement under your future home. Your site conditions might require drainage systems to protect your foundation from moisture damage.
2. Pouring the foundation and footings
Your home's weight distribution to the soil depends on footings. These footings use concrete reinforced with rebar, which workers pour into excavated trenches. Homes in freezing areas need a T-shaped foundation with footings below the frost line. A slab-on-grade foundation works better in non-freezing regions and has thicker edges than its interior. Your soil conditions and structure size determine the footing dimensions.
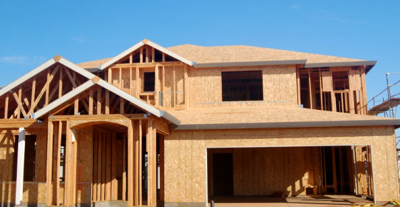
3. Framing the house structure
The framing stage turns your foundation into a recognizable structure. Your home's skeleton uses vertical studs, horizontal plates and diagonal bracing that transfer the building's weight to the foundation. Simple drilling through lightweight framing systems makes service installation easier with pre-notched openings for pipes and cables. Licensed certifiers must inspect the frame before adding any cladding or linings.
4. Installing roofing, windows, and doors
The "lock-up" stage makes your home secure and weatherproof. Workers install roof sheeting, gutters, windows and external door frames during this phase. Your house's outline becomes visible and gives you a real sense of its size and shape.
5. Exterior sheathing and weatherproofing
Weatherproofing protects your frame from moisture damage in the final exterior phase. The right waterproofing systems stop water infiltration through membranes, sealants and drainage systems. Your exterior walls need protection from water damage caused by hydrostatic pressure and capillary action. This vital step helps prevent mould growth and structural deterioration while extending your home's lifespan.
Interior Systems and Fit-Out
The focus moves to interior systems once your home's exterior shell becomes weathertight. These vital components reshape your structure into a liveable space.
1. Installing plumbing, HVAC, and electrical systems
Multiple trades work at the same time during this busy stage. Plumbers install water supply and waste pipes. Electricians run wiring for outlets and lighting. HVAC specialists position ductwork and system components. The process needs proper coordination because these systems must work together without interference.
2. Inspections for plumbing and electrical
Mandatory inspections verify that all work meets building regulations before walls are closed up. Plumbers need to notify authorities at three points: before starting work, when ready for inspection, and after completion. Electrical systems also need a full safety compliance and functionality check.
3. Insulation and drywall installation
Workers fit insulation materials between wall studs to improve energy efficiency. They use fiberglass batts, cellulose, or spray foam. The team then measures and cuts drywall panels. These panels are secured to the frame with screws placed 8-16 inches apart. A ¼-inch gap stays between panels to allow house settling.
4. Painting, flooring, and cabinetry
Interior surfaces get their finishing touches. The walls receive paint first. The team then installs flooring materials. Cabinetry and built-in storage come next in a well-coordinated sequence.
5. Fitting light fixtures, switches, and outlets
Electricians come back to install visible components. They complete electrical circuits throughout the home with light fixtures, switches, outlets, and fans.
6. Installing kitchen and bathroom fixtures
The final step brings your kitchen and bathrooms to life. Plumbers install sinks, toilets, shower screens, and connect appliances.
Final Stages and Handover
Your house building experience enters its final exciting phase. This last stage turns your construction project into a home that's ready to welcome you.
1. Landscaping and exterior finishes
Good landscaping does more than just look beautiful — it protects your home's future. Water drainage should flow away from the house. All pathways need proper slopes to stop water from collecting. Garden beds work best when placed away from walls. Trees with big root systems should stay far from foundations and pipes. Modern facades look great with native plants that handle drought well. Structured plants like agaves need minimal care and add visual appeal. Clear pathways and smart lighting placement make your home safer and more attractive.
2. Final inspection and occupancy certificate
Getting an occupation certificate comes before you move in. This vital document from your local council or private certifier shows your home meets all regulatory standards. The certificate proves your power and water connections work properly and confirms your building stays weatherproof. Your home can have small defects at this stage, but no major problems should exist.
3. Final walkthrough with your builder
The walkthrough gives you a chance to learn your home's features and spot any remaining problems. Check all counters, fixtures, floors and walls carefully. A final inspection list needs signatures from you and your builder to document any defects or unfinished work. Your builder should fix these issues within 21 days, unless materials aren't available.
4. Receiving warranties and documentation
The handover process includes collecting key documents like practical completion certificates, inspection records, and warranty papers for your appliances. You'll need reports from electricity, gas, water and sewerage providers too. Your contract protects you through statutory warranties and a defects liability period — usually three months after handover. These warranties guarantee quality workmanship and compliance with building codes.
Your first home represents one of life's most important investments and achievements. The journey from an empty plot to a fully functional house follows a logical progression. Breaking it down into manageable stages makes it less daunting.
First-time builders can participate better in the process by understanding each construction phase. This knowledge helps them make informed decisions. The pre-construction stage builds significant groundwork through land selection, professional team assembly, and financial preparation. The structural build turns your vision into a tangible framework, and interior systems bring life to your space.
Patience proves vital throughout this 12-24 month process. Your investment could get costly if you rush any stage, and safety concerns might arise. You retain control and can address issues quickly by keeping open communication with your builder. This prevents small issues from becoming major problems.
Taking photos of each stage and keeping paperwork in order helps with future reference. This creates a meaningful record of your journey and provides valuable evidence for potential warranty claims.
The final handover starts your life in a custom-built home that matches your needs. Problems will without doubt come up during construction. Yet creating a space that fits your lifestyle perfectly makes the whole ordeal worth it. Your new house stands ready for you to fill with memories for years ahead. Electrical services in Edmonton are essential for keeping homes and commercial spaces safe, efficient, and up to code.

(0) comments
We welcome your comments
Log In
Post a comment as Guest
Keep it Clean. Please avoid obscene, vulgar, lewd, racist or sexually-oriented language.
PLEASE TURN OFF YOUR CAPS LOCK.
Don't Threaten. Threats of harming another person will not be tolerated.
Be Truthful. Don't knowingly lie about anyone or anything.
Be Nice. No racism, sexism or any sort of -ism that is degrading to another person.
Be Proactive. Use the 'Report' link on each comment to let us know of abusive posts.
Share with Us. We'd love to hear eyewitness accounts, the history behind an article.