

The best travel footage rarely comes from recording every mile.
It comes from the moments that make the trip feel specific: bicycles being lifted from the car before sunrise, tires moving over a quiet road, the first view of the ocean around a coastal bend or the exhausted satisfaction of reaching the end of a difficult climb.
Those moments are easy to miss when the person holding the camera is also trying to drive, navigate or keep both hands on the handlebars.
Capturing a road trip or cycling adventure well requires more than turning on a camera and letting it run. The strongest footage comes from planning a simple story, choosing a few useful angles and mounting equipment carefully enough that filming never becomes a distraction or a hazard.
The goal is not to document every second. It is to come home with enough meaningful footage to make the trip feel alive again.
Decide What Story the Trip Is Telling
Before choosing a camera, mount or editing app, decide what the trip is really about.
A road trip might be centered on the landscape, the vehicle, the people traveling together or the small stops discovered along the way. A cycling trip may be about athletic effort, friendship, changing weather, local food or the contrast between difficult climbs and quiet stretches of open road.
That decision helps determine which shots are worth collecting.
A landscape-driven story needs wide views that establish place. A cycling film needs movement, but it also needs the details surrounding the ride: checking tire pressure, filling water bottles, studying the route and unloading the bikes.
Do not begin with a long list of equipment. Begin with a beginning, middle and end.
The opening might show the car being packed or the bicycles being prepared. The middle should contain movement, changing scenery and a few setbacks or discoveries. The ending should give the trip a sense of arrival.
A parked bike, a hotel balcony, a shared meal or the last light over the road may finish the story more effectively than another minute of driving footage.
Use the Simplest Camera That Can Do the Job
A phone is often enough.
Modern phones are quick to access, easy to stabilize and well suited to short travel clips. They work particularly well for:
roadside details;
restaurants and hotels;
quick interviews;
scenery during planned stops;
vertical social content;
spontaneous moments.
An action camera makes more sense when the equipment will be exposed to vibration, dust, wind, water or changing weather. Its small size also makes it easier to position on a bicycle, helmet or vehicle.
A mirrorless or DSLR camera provides greater control over lenses, depth and low-light performance. It also adds weight, takes longer to set up and requires a more substantial mounting system.
Use the larger camera when its advantages will be visible in the finished footage. Carrying more equipment does not automatically create a better travel film.
FINE’s feature on the GoPro and modern adventure filming offers a closer look at when a compact action camera may be the more practical choice.
Keep Clips Short and Intentional
Long recordings fill memory cards, drain batteries and create hours of unnecessary editing.
Most travel sequences need only several seconds from each angle. Begin recording before the movement starts, allow the action to pass through the frame and continue briefly afterward.
For a cyclist passing a stationary camera, record a few seconds before the rider enters, the full pass and several seconds after the rider leaves.
Those clean beginnings and endings give the editor space to make smoother transitions.
Continuous recording is useful when something unpredictable is happening or when a real conversation matters. For most road and cycling footage, shorter intentional clips are more useful.
Capture More Than Movement
Road-trip footage often becomes repetitive because every clip shows the same thing: road passing beneath the camera.
Movement matters, but contrast makes it interesting.
Capture:
hands securing a bike;
shoes clicking into pedals;
a map on the dashboard;
condensation on a cold drink;
road signs;
changing weather;
gravel beneath a tire;
the inside of the car during a quiet stretch;
a rider pausing at the top of a climb;
the landscape after everyone has stopped moving.
These details make the final video feel personal rather than generic.
They also give the edit places to slow down between faster car and cycling sequences.
Use Car POV Footage Sparingly

A camera mounted inside or outside a car can create an immediate sense of movement.
Useful perspectives include:
a forward view through the windshield;
a low side angle near the vehicle;
a rear-facing view of the road disappearing behind;
a side angle that includes both the vehicle and landscape;
a stationary shot of the car entering and leaving the frame.
A few seconds of car POV footage can establish speed, location and direction. Several uninterrupted minutes usually become monotonous.
Use mounted footage as one layer of the story, not the entire story.
FINE’s guide to gadgets and accessories for a smoother road trip includes additional ideas for organizing charging, navigation and vehicle equipment before leaving.
Mounting a Camera Outside the Car
Exterior camera placement can create cinematic footage that would be difficult to capture safely by hand. It also creates more risk than filming from inside the vehicle.
The mounting surface must be smooth, clean and compatible with the system. Dust, moisture, wax residue and curved body panels can weaken suction. The combined weight of the camera, lens and accessories must remain within the mount’s stated limit.
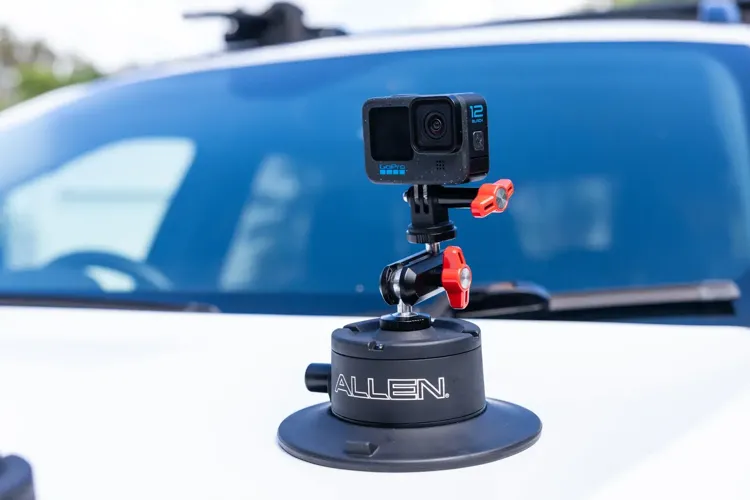
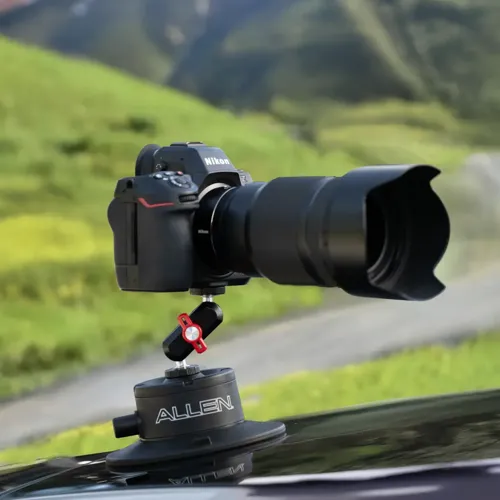
The Smart Suction® SNAP: Camera Mount is one current option designed for vehicle-mounted filming.
It uses a six-inch suction cup, adjustable ball head and integrated Bluetooth pressure sensor. The sensor continuously monitors attachment and sends an alert through the Allen app when attention is required. Allen lists compatibility with DSLR, mirrorless, compact and GoPro-style camera systems weighing up to 6.6 pounds, including lenses and accessories.
The monitoring feature addresses one of the most common concerns with suction mounts: wondering whether the seal has begun to weaken.
It should still be treated as an additional layer of information, not a replacement for careful installation.
Before the vehicle moves:
clean and dry the mounting surface;
inspect the suction cup;
verify the total equipment weight;
tighten the camera and ball head;
test the mount firmly by hand;
confirm the app connection;
follow the approved mounting orientation;
attach a secondary safety tether when recommended.
Stop the vehicle immediately in a safe location if the app reports a pressure issue or the mount appears to have shifted.
No footage is worth risking the camera, the vehicle or another person on the road.
Never Adjust the Camera While Driving
The driver should not monitor framing, change camera settings or reach toward a mount while the vehicle is moving.
Set the camera before departure. A passenger may operate permitted controls, but physical adjustments should still be made only after the vehicle has stopped safely and legally.
The camera must not block the driver’s view, interfere with mirrors, cover lights or extend into a position that creates a hazard.
Road and equipment laws vary by location. Confirm local requirements before attaching anything to the exterior of a vehicle.
A mount can remain physically secure and still create a distraction if the driver is watching the camera instead of the road.
Capture Cycling Footage Without Distracting the Rider
A rider should never hold a phone, repeatedly look backward or adjust equipment while moving.
Safer methods include:
placing a stationary camera along the route before the rider passes;
asking another person to film from a secure location;
using a properly fitted handlebar, chest or helmet mount;
mounting a compact camera forward or rearward;
filming short clips during planned stops.
Test the setup on a short local ride before taking it on a longer route.
Check that the mount does not interfere with steering, braking, cables, lights or the rider’s field of view. Loose straps and poorly secured accessories can become dangerous once the bicycle is moving.
The camera should be familiar enough that the rider does not need to search through menus or make repeated corrections during the ride.
Make Cycling Footage Feel Faster and More Dimensional
A camera aimed only at the pavement often makes a ride look flatter and slower than it felt.
Vary the perspective.
Place a stationary camera low beside the route to make passing movement feel stronger. Include foreground details such as grass, rocks, lane markings or tree branches to create depth.
Use a wide angle to establish the landscape, then move closer for details of pedals, wheels, hands and facial expressions.
Show the rider entering and leaving the frame rather than keeping the bicycle centered in every shot.
For hills, a side angle often communicates the slope more clearly than a forward-facing camera. A wide shot from below can also make the climb feel more substantial.
Early and late daylight tends to produce softer contrast and more dimension than the brightest part of the afternoon.
Watch for Reflections
Cars, windows, sunglasses and polished bicycle frames can reveal more than expected.
Before recording, check for:
the camera operator reflected in the window;
dashboard clutter;
glare across the windshield;
bright reflections on the vehicle body;
unwanted objects visible in mirrors;
reflections in sunglasses or helmets.
Moving the camera only a few inches can remove a distracting reflection.
A circular polarizing filter may help reduce some reflections when used with a compatible camera, but it should not be adjusted while driving.
Record Natural Sound Separately
Exterior camera footage often contains mostly wind and road noise.
Instead of relying on the mounted camera’s microphone, collect clean natural sound during stops.
Useful sounds include:
tires moving over gravel;
a bicycle freewheel;
shoes clipping into pedals;
car doors closing;
footsteps;
ocean waves;
birds;
café sounds;
quiet conversation;
a bicycle pump or gear change.
These details can be layered into the final edit beneath footage recorded elsewhere.
Natural sound makes the video feel like a real place rather than a series of silent images covered by music.
Prepare for Batteries and Storage
Video consumes batteries and memory much faster than still photography.
Bring:
charged spare batteries;
a reliable power bank;
the correct charging cables;
several memory cards;
a weather-resistant card case;
a lens cloth;
protective caps and cases.
Avoid storing the entire trip on one memory card.
When possible, copy important footage to a second device or portable drive at the end of each day. Organize files by date, location or activity so the final edit does not begin with hundreds of unidentified clips.
Delete obvious mistakes only after the footage has been backed up. A clip that appears unremarkable on a small screen may contain a useful sound, expression or transition.
Put the Camera Away Sometimes
Travel can quickly become a production if every meal, view and conversation needs to be recorded.
Choose a few periods each day when the camera remains packed away.
The strongest footage usually comes from someone who has paid attention to the trip rather than viewing all of it through a screen.
A short sequence of carefully observed moments will often communicate more than hours of indiscriminate recording.
The camera should support the experience, not become the experience.
Edit for the Feeling Rather Than the Timeline
The finished film does not need to show everything in the order it happened.
Begin with the strongest visual or sound. Move between wide scenery, close details, movement and quieter moments. Let natural sound interrupt the music occasionally.
Remove repeated shots even when each one is technically good.
A concise road-trip sequence might include:
the car or bikes being prepared;
the route beginning;
one exterior car angle;
one cycling detail;
a wide landscape;
a roadside stop;
the arrival;
a quiet final image.
The final video should be much shorter than the journey.
Its purpose is not to prove that every mile was recorded. It is to recreate what the trip felt like.
Better Footage Begins With Better Judgment
Strong travel footage is not the result of placing cameras everywhere.
It comes from understanding which moments need movement, which need stillness and when the safest decision is to stop filming.
Choose the simplest camera capable of producing the shot. Keep clips short. Vary the perspective. Collect natural sound and verify every mount before the vehicle or bicycle begins moving.
Technology such as Bluetooth pressure monitoring can provide useful information, but it does not replace clean surfaces, correct installation, weight limits, safety tethers or responsible driving.
The most memorable road-trip and cycling films feel close to the experience without interfering with it.
That is the balance worth capturing.


(0) comments
We welcome your comments
Log In
Post a comment as Guest
Keep it Clean. Please avoid obscene, vulgar, lewd, racist or sexually-oriented language.
PLEASE TURN OFF YOUR CAPS LOCK.
Don't Threaten. Threats of harming another person will not be tolerated.
Be Truthful. Don't knowingly lie about anyone or anything.
Be Nice. No racism, sexism or any sort of -ism that is degrading to another person.
Be Proactive. Use the 'Report' link on each comment to let us know of abusive posts.
Share with Us. We'd love to hear eyewitness accounts, the history behind an article.