
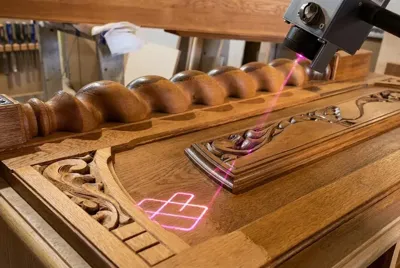

Old houses often hide their best features under decades of paint. A quarter-sawn oak staircase, a mahogany entry door, or heart pine window trim may carry five or six coats of finish, some failing and some containing lead. Removing those layers without losing the wood underneath has always been the hardest part of restoration.
A laser sander offers a different route. Instead of grinding the surface down, it uses controlled pulses of light to lift coatings off the grain. This guide explains how the technology works, where it fits into historic woodwork restoration, and which safety steps matter before any work begins.
Why Historic Woodwork Needs a Gentler Approach
Period millwork is valuable because of its details. Crisp bead profiles, hand-cut moldings, carved rosettes, and original tool marks are what separate a 120-year-old door from a reproduction. Once those details are sanded away, they cannot be put back.
The National Park Service makes the same point in its Preservation Briefs. Brief 10, which covers paint problems on historic woodwork, recommends removing paint only when necessary and using the gentlest effective method. The Secretary of the Interior's Standards for the Treatment of Historic Properties follow the same principle.
Traditional methods often struggle with that standard. Abrasive sanding removes wood along with paint, rounds sharp edges, and leaves swirl marks that show under a clear finish. That is why many restorers now look at laser wood stripping as an option for fragile, detailed pieces.
How Does a Laser Sander Remove Paint from Wood?
Despite the name, a laser sander does not sand anything. It works by laser ablation. A focused beam delivers energy in very short pulses, and the coating absorbs that energy faster than it can spread into the wood. The paint heats, breaks apart, and lifts off as fine particles and vapor.
Timing is the key. Each pulse lasts only a tiny fraction of a second, so the substrate has time to cool between bursts. With the right settings, the paint layer goes and the wood fibers stay largely intact.
Operators control the result by adjusting power, pulse frequency, scan speed, and spot size. Flat panels can be cleared quickly, while carved or turned elements need slower passes that follow each contour.
Anyone wondering whether a laser sander truly works on painted wood should know that results depend on three things: the machine, the settings, and the operator's skill. A small test patch in an inconspicuous spot is still the most reliable way to confirm that the process suits a particular surface.
Fiber vs CO2 Lasers: Which Technology Suits Wood?
Two main laser types appear in workshops, and they behave very differently on timber.
CO2 lasers operate at a long infrared wavelength that wood absorbs strongly. That makes them excellent for cutting and engraving, but it also means the beam tends to burn into the surface. For restoration, that is usually the opposite of what you want.
Fiber lasers work at a shorter wavelength and are the more common source in handheld cleaning systems. Within this group, pulsed fiber lasers are generally preferred for wood because their short, high-peak pulses limit heat buildup. Continuous-wave fiber units put out steady energy that suits heavy rust on steel but raises the risk of scorching softer materials.
How Laser Stripping Compares with Traditional Methods
The table below summarizes the practical differences when removing paint from wood on historic pieces.
Method | Main advantage | Main drawback on historic wood |
|---|---|---|
Abrasive sanding | Fast on flat surfaces | Removes wood and softens fine details |
Chemical strippers | Reach thick, layered coatings | Residue, fumes, and raised grain |
Heat guns | Soften heavy paint quickly | Scorch and fire risk, lead fumes at high heat |
Laser stripping | Precise, dry, and preserves detail | Higher equipment cost and strict safety needs |
Chemical strippers remain useful for large, flat areas, but they can leave residue in open grain and raise the fibers. Some older formulas relied on methylene chloride, which the EPA has since heavily restricted. Heat guns work well on thick paint yet can scorch wood, crack old glass, and release lead fumes at high temperatures.
Matching the Process to the Finish and Wood Species
Not every coating reacts the same way to a beam. Dark, pigmented paints usually absorb laser energy well and come off cleanly. Clear finishes such as shellac and varnish are more variable, because some wavelengths pass partly through them and reach the wood.
Wood species matter too:
- Oak has open pores that trap chemical residue, so a dry process like laser cleaning can be an advantage.
- Mahogany is dense and stable, but its warm color darkens if the settings run too hot.
- Heart pine contains a lot of resin, which can bubble or darken under excessive heat, so lower power and faster passes are safer.
Many restorers combine methods. They use the laser to clear paint from carvings and tight profiles, then finish flat areas with light hand sanding or a mild solvent wipe.
Lead Paint, PPE, and Fume Extraction
Safety is where laser projects succeed or fail. In the United States, homes built before 1978 may contain lead-based paint, and the EPA Renovation, Repair and Painting (RRP) Rule requires certified firms and lead-safe work practices when paid contractors disturb painted surfaces in those homes. Test for lead before starting, and check which rules apply in your area.
Laser ablation turns coatings into fine particles and fumes, so control at the source is essential. A sound setup includes:
- A fume extractor with HEPA filtration, ideally with an activated carbon stage, positioned close to the work area.
- Laser safety glasses rated for the machine's specific wavelength and optical density.
- A properly fitted respirator, gloves, and protective clothing.
- A controlled work zone with signage, since most handheld cleaning lasers are Class 4 devices.
Practical Tips for a Successful Laser Restoration Project
Start by documenting the piece with photos and notes on the existing finishes. Paint history can be part of a building's story, and some owners choose to keep a small sample area intact.
When comparing laser cleaning machines, look for adjustable pulse settings, a scan head that suits the size of your pieces, and reliable after-sales support. Hiring a specialist contractor is often sensible for a one-off project.
Work in stages. Clear a small section, inspect it under raking light, and adjust before moving on. Once the wood is bare and dust-free, apply a finish that suits the period, such as shellac, oil, or a compatible varnish.
Historic woodwork deserves a method that respects its details. Abrasive sanding, chemical strippers, and heat guns all have roles, but each can erase carvings, leave residue, or scorch the grain.
A laser sander offers a more controlled path. Pulsed fiber systems lift paint layer by layer, preserving profiles in oak, mahogany, and heart pine when settings are tested carefully. Success still depends on preparation: testing for lead, following the EPA RRP rule where it applies, using proper PPE, and running effective fume extraction.
Approached this way, laser technology can bring original craftsmanship back into view and ready it for a finish that lasts another century.


(0) comments
We welcome your comments
Log In
Post a comment as Guest
Keep it Clean. Please avoid obscene, vulgar, lewd, racist or sexually-oriented language.
PLEASE TURN OFF YOUR CAPS LOCK.
Don't Threaten. Threats of harming another person will not be tolerated.
Be Truthful. Don't knowingly lie about anyone or anything.
Be Nice. No racism, sexism or any sort of -ism that is degrading to another person.
Be Proactive. Use the 'Report' link on each comment to let us know of abusive posts.
Share with Us. We'd love to hear eyewitness accounts, the history behind an article.